I was doing some blog hopping tonight and stumbled upon this...Top Tip Tuesday. I thought I would let you know about it. The idea behind it is a place where we can all go to leave tips and ideas. There is even prizes involved! Sounds like a great idea! Head on over and become a follower, then beginning in Sept., the tips will start. What a great way for all of us Crafters to share ideas!
Again the blog is Top Tip Tuesday!
Friday, July 30, 2010
Board Book Gift
We are going to a birthday party tonight for my friend's 1 year old. She said no gifts, but I really struggle with that idea...lol. So I decided to make something, at least I didn't BUY anything. Back in May I went to the CKC Convention here in Buffalo. One of the things I purchased with my volunteer money was a set of board books. They actually come in a nice box and there are 8 or 10 of them, and come complete with the PP to cover them too. Well since I decided to do this last night at like...9pm...I only had time to do 1 book. Not like they HAVE to be used as a set...lol. So here is what I started with... The board books are 4" x 4", and have 7 double side pages (so 14 pages including the cover and back). They are very thick and sturdy too. I used some papers from the Target $1 spot I picked up the other day (instead of the papers that came with it, because they were kinda dark/fallish colors). I wanted to use cute girly colors for this project. So I cut the papers in 4 x 4 squares and attached with red line sticky tape. Here is a couple photos of the finished project.

The board books are 4" x 4", and have 7 double side pages (so 14 pages including the cover and back). They are very thick and sturdy too. I used some papers from the Target $1 spot I picked up the other day (instead of the papers that came with it, because they were kinda dark/fallish colors). I wanted to use cute girly colors for this project. So I cut the papers in 4 x 4 squares and attached with red line sticky tape. Here is a couple photos of the finished project.On the cover I cut a heart with my Cricut, and wrote "All About Me". On each page, I cut either a 1"x2" rectangle or punched an oval from purple CS. For the first 1/2 of the book I wrote on the CS pieces things like; Me!, My Family, Mommy, Daddy, etc. The last couple pages I just attached the CS pieces and this will give her mom a chance to put whatever she wants there. I think it turned out pretty cute...especially since I did it on such a time crunch...lol. The only other thing I would like to do to it is to reinforce the binding. It is pretty good, but I am just thinking little hands won't be as gentle as us adults on it. I actually sent my DH to the store to look for purple duct tape for me to reinforce the binding...lol.
Well, we have a busy weekend ahead of us now. We have this birthday party, the Summerfest/Lawn Fete event at our church, and our family picnic. So Hopefully I will also be able to squeeze some craft room time in there too, but no promises...lol. Have a great weekend!
The "Stolen" Easter Plaque
So I had to share this with you, and the story that goes with it. I was at my mom's house the other day. I noticed this plaque on her fridge.  So being July...well almost August...I asked her why she had an Easter plaque hanging up still. She said someone had given it to her, and she just never took it down. Well, me being me, I said "Can I have this? I need to fix it." She said sure, and off I went. LOL.
So being July...well almost August...I asked her why she had an Easter plaque hanging up still. She said someone had given it to her, and she just never took it down. Well, me being me, I said "Can I have this? I need to fix it." She said sure, and off I went. LOL.So, here is what I did to it... Much better right? I thought so at least...ha ha. I used some PP from My Mind's Eye for the background. I attached it using mod-podge. I then stamped the butterflies...which are from Sweet 'n Sassy's Everyday Miracles stamp set. I colored them with markers. I also made them 3-D...by stamping a 2nd butterfly, and layering.
 For the all pink butterfly, I added some crystal rhinestones to the wings using my i-Rock. The sentiment in the middle was inspired by the devotion my DH and I read before bed the other night. For some reason this phrase really stood out to me that night. I added some crystals to the "i"s too. Last I added the white ribbon bow to the top right...mostly to cover up the small tear in the paper, but just for some extra embellishment too.
Much better right? I thought so at least...ha ha. I used some PP from My Mind's Eye for the background. I attached it using mod-podge. I then stamped the butterflies...which are from Sweet 'n Sassy's Everyday Miracles stamp set. I colored them with markers. I also made them 3-D...by stamping a 2nd butterfly, and layering. For the all pink butterfly, I added some crystal rhinestones to the wings using my i-Rock. The sentiment in the middle was inspired by the devotion my DH and I read before bed the other night. For some reason this phrase really stood out to me that night. I added some crystals to the "i"s too. Last I added the white ribbon bow to the top right...mostly to cover up the small tear in the paper, but just for some extra embellishment too. Now to see what my mom thinks of her "new" plaque. Thanks for stopping by!
Thursday, July 29, 2010
How you Peeling????
Hello, and happy Thursday. I hope your week has been good so far. We have a busy weekend ahead of us. This weekend is the Summerfest/carnival/lawn fete/whatever you want to call it event at our church. My DH and I are both volunteering to work on Saturday (separate times for childcare reasons). Then Sunday is our family picnic on my DH's side of the family. Oh yeah, and we have a birthday party to go to on Friday evening too. Guess we WON'T be camping this weekend =(. Well, as promised on Tuesday, I wanted to share a card with you today that I made with this adorable Banana image from QKR Stampede. I have been eyeing this guy since I first started checking out the QKR Stampede website. So I finally got him this time. 
Isn't it cute????!!! I just think he is so funny. Well I stamped him off and colored with markers. I trimmed him and layered it onto a yellow CS circle. Now I didn't' have any banana background paper on hand (gee I wonder why? lol), so I decided to try out my Cricut markers. I got them when I first got my Cricut, but never opened the package. So I thought now was the time to try. I found this little banana image on the Create-a-Critter Cartridge. So I experimented, and ended up with what you see above. I guess I could have put the rows a little closer together, but all and all not bad for the first time playing with the markers. I also added little faces to them to go with the banana stamped image. I added some yellow ribbon, and peachish colored buttons. Last I hand wrote the sentiment..."Hope you are peeling better soon!", and cut with an oval punch. I layered that onto a yellow scalloped oval, and attached with foam tape.
If you like this cute and silly banana image, be sure to check out the QKR Stampede store for more adorable images. Also, if you haven't "Liked" the QKR Stampede Facebook page yet, follow THIS link and be sure to "like" us today. Every Monday for the month of August, Maribeth (QKR Stampede owner) will be picking one luck FB fan to win any stamp of their choice from the QKR Stampede website.
Wednesday, July 28, 2010
Friends are Flowers
Hi there. Today I wanted to play along with a couple challenges. First I used the sketch from this week's What If Wednesday challenge over at the Repeat Impressions Blog. I also added some polka dots to my card, which is the challenge this week over at the Simon Says Challenge Blog.  I was looking through my giant stash of PP yesterday and found this polka dotted paper. I really liked the colors in it, so I wanted to use it for a challenge. How perfect that this week's Simon Says Challenge is to use dots! So I used that as my background paper. Then layered onto that. I stamped this image which is from Repeat Impressions. It is actually only part of the stamp. It is one of the quartet stamps...I only used 2 of the 4 squares for this one. I layered that onto some green PP, and layered that onto some purple with polka dots PP. I did use a boarder punch along the bottom of the purple, but it is hard to see the details with all these polka dots...lol. Last, I added the embellishments. I added some ribbon that went with the PP, a paper flower with brad in the center, and last I i-rocked the flower centers. I guess I am a little i-Rock crazy...my DD tells me I am in love with my i-Rock...lol. I have been using it a lot lately. It just adds so much to the card...or at least I think so...lol.
Well that is all for now. Thanks for stopping by. Don't forget to stop back tomorrow to see what I have for QKR Stampede Thursday.
I was looking through my giant stash of PP yesterday and found this polka dotted paper. I really liked the colors in it, so I wanted to use it for a challenge. How perfect that this week's Simon Says Challenge is to use dots! So I used that as my background paper. Then layered onto that. I stamped this image which is from Repeat Impressions. It is actually only part of the stamp. It is one of the quartet stamps...I only used 2 of the 4 squares for this one. I layered that onto some green PP, and layered that onto some purple with polka dots PP. I did use a boarder punch along the bottom of the purple, but it is hard to see the details with all these polka dots...lol. Last, I added the embellishments. I added some ribbon that went with the PP, a paper flower with brad in the center, and last I i-rocked the flower centers. I guess I am a little i-Rock crazy...my DD tells me I am in love with my i-Rock...lol. I have been using it a lot lately. It just adds so much to the card...or at least I think so...lol. Well that is all for now. Thanks for stopping by. Don't forget to stop back tomorrow to see what I have for QKR Stampede Thursday.
Tuesday, July 27, 2010
Hoo Hoo...Merry Christmas
Hi there. I was spoiled today. My hubby took the kids to the amusement park, and I got to stay home and stamp! Wooo hooo! I was able to get 5 card fronts done...which is just wonderful for me. All of them were made using the wonderful images from QKR Stampede too! See...Maribeth...the owner of QKR Stampede is going to be going to a convention in Sept. The first one for this awesome company. So, she is trying to get as many card fronts as possible to display at the convention. Also, if you aren't a fan of QKR Stampede on Facebook yet...now is the time to sign up. Every Monday for the month of August, Maribeth will be picking one lucky fan to receive a free stamp of your choice! How cool is that! HERE is the link to the QKR Stampede Facebook page...join now!
So I wanted to share one of the cards I made today. This one is also for 3 different challenges. I used this week's Sweet Stop Sketch for my layout. I also made a Christmas card...which is the challenge over at the Buffalo Stamps and Stuff Blog this week. And, my Christmas card is pastel colors...which is the challenge at the Cupcake Craft Challenge this week. I used this adorable owl image from QKR Stampede called Christmas Cheer. I stamped and colored with watercolor crayons. I paper pieced the hat and scarf, and added some white fun flock to the hat. The papers are from TAC. I added some pink ribbon that I had hanging out in the ribbon drawer. I hand wrote the sentiment...which was supposed to be like "Ho Ho Ho", but the owl version...lol.
So I wanted to share one of the cards I made today. This one is also for 3 different challenges. I used this week's Sweet Stop Sketch for my layout. I also made a Christmas card...which is the challenge over at the Buffalo Stamps and Stuff Blog this week. And, my Christmas card is pastel colors...which is the challenge at the Cupcake Craft Challenge this week.
I used this adorable owl image from QKR Stampede called Christmas Cheer. I stamped and colored with watercolor crayons. I paper pieced the hat and scarf, and added some white fun flock to the hat. The papers are from TAC. I added some pink ribbon that I had hanging out in the ribbon drawer. I hand wrote the sentiment...which was supposed to be like "Ho Ho Ho", but the owl version...lol. Well that is all for now. I will be posting the other cards I made over the next few weeks for you to see too. Stop back Thursday to see an adorable card I made using my Cricut and THIS image from QKR Stampede.
Saturday, July 24, 2010
Natalie's Challenge Card
I FINALLY got a chance to help Natalie finish her card for the challenges. So this is her card for the Kona Kids Challenge (Bling it Up) and Little Hands do Crafts (bears)
She used this bear image from TAC, and colored with colored pencils. The PP is from Target $1 spot. She wanted the green CS along the side with the pink CS strip on it. Then she picked some heat set gems for the bling. I helped her put them on using my i-Rock.
I also wanted to share the card she made for the previous challenge. I feel terrible I never got it posted in time, but I thought I would share it anyway. The card was for a summer, and beach themed challenge. 
The images are from Hannah Stamps.
Thursday, July 22, 2010
Frosty in July QKR Stampede Blog Hop!
Hi there hoppers! Welcome to our July Design Team Blog hop for QKR Stampede! We are so happy you have decided to hop along with us. If you just arrived from Carol's Blog then you are on the right track. If you started here, please head back to the QKR Stampede Blog, and start hopping along from the beginning. Trust me, you don't want to miss any of these "Frosty in July" cards we have for you.
As you can see from the title and the previous blogs (weren't they great???!!!!), we are featuring Christmas and Winter images this month. Well here is my card. So mine isn't so "frosty", but it is still Christmasy (I don't think that is a word...lol). I choose this image for a reason. My oldest brother and his family just moved from the Orlando, FL area to Dallas, TX. I thought this image would be adorable to send them on a card this holiday. Which will be their first in TX. Here is a close-up of the cactus image.
 Oh, I guess it would help if I told you the name of this cute cactus image...It is called Christmas Cactus (ironic...lol), and you can find this image and many other Christmas images right HERE in the QKR Stampede Store. So, I colored the image with markers, and added some stickles to the lights and the ornaments. I just love that little snake peeking out behind too...lol. I layered the image onto some PP from TAC. The sentiment is also from QKR Stampede and is called "Cowboy Christmas". I thought it went perfect with the cactus. I stamped it in black ink, and then went over the whole thing with red stickles. I was originally just going to do the Christmas word, but got a little too excited...ha ha. Here is a close up of my over-excited stickles experience.
 Last, I added some ribbon, and buttons. Well I was so glad to be able to share this card with you using these great QKR Stampede images.
 So mine isn't so "frosty", but it is still Christmasy (I don't think that is a word...lol). I choose this image for a reason. My oldest brother and his family just moved from the Orlando, FL area to Dallas, TX. I thought this image would be adorable to send them on a card this holiday. Which will be their first in TX. Here is a close-up of the cactus image.Oh, I guess it would help if I told you the name of this cute cactus image...It is called Christmas Cactus (ironic...lol), and you can find this image and many other Christmas images right HERE in the QKR Stampede Store. So, I colored the image with markers, and added some stickles to the lights and the ornaments. I just love that little snake peeking out behind too...lol. I layered the image onto some PP from TAC. The sentiment is also from QKR Stampede and is called "Cowboy Christmas". I thought it went perfect with the cactus. I stamped it in black ink, and then went over the whole thing with red stickles. I was originally just going to do the Christmas word, but got a little too excited...ha ha. Here is a close up of my over-excited stickles experience.Last, I added some ribbon, and buttons. Well I was so glad to be able to share this card with you using these great QKR Stampede images.
 Now it is time to hop on over to SARAH'S blog and see what she has in store for you.
Don't forget if at anytime you get "lost" along the hop, just head on over to the QKR Stampede Blog, and pick up from there. Oh, and don't forget to leave some comments for us along the way. We love to "hear" your thoughts!
Black and White Puppy
Here is another card I made yesterday. My husband "forced" me to go to my stamproom. HA HA HA...really though he did say "Why are you up here? Go downstairs and stamp!" So I didn't argue, and went and stamped. At least I was doing laundry while I was down there, but did enjoy the time for me. I made this card for 2 challenges. First I used this sketch from this week's Whimsie Doodles challenge. I also used a dog on the card, so it also qualifies for this week's Cupcake Craft Challenge, which is Cats & Dogs. 
So I was attempting an all black and white card. I started with the dalmatian image onto white. For the base I used white, and added a piece of Core-dinations CS. I wadded it up into a ball, and then flattened and sanded it. For the black strip, I used white ink and the little paw prints from the Sweet 'n Sassy set "I woof you". I used the bone stamp from that set for the paper behind the dalmatian. For the piece under the dog, I used the core-dination CS again, and tore it and sanded it. Last I added some white eyelets. It didn't turn out as I have envisioned it...lol, but I still think it was cute. Thanks for looking!
So I was attempting an all black and white card. I started with the dalmatian image onto white. For the base I used white, and added a piece of Core-dinations CS. I wadded it up into a ball, and then flattened and sanded it. For the black strip, I used white ink and the little paw prints from the Sweet 'n Sassy set "I woof you". I used the bone stamp from that set for the paper behind the dalmatian. For the piece under the dog, I used the core-dination CS again, and tore it and sanded it. Last I added some white eyelets. It didn't turn out as I have envisioned it...lol, but I still think it was cute. Thanks for looking!
Cup of Tea
Hi there. Wanted to quickly share this card I made for this week's Simon Says Challenge. This week's challenge is a sketch challenge. So here is the card I made for this. 
I used this adorable Cocoa teacup stamp from Sweet 'n Sassy. I colored it to go with the teacup PP. The other CS colors are also colors from the PP. I added the brown teacup brads, and the sentiment (which is from the same stamp set as the teacup). That is all for now! Thanks for stopping by!
I used this adorable Cocoa teacup stamp from Sweet 'n Sassy. I colored it to go with the teacup PP. The other CS colors are also colors from the PP. I added the brown teacup brads, and the sentiment (which is from the same stamp set as the teacup). That is all for now! Thanks for stopping by!
My attempt at a boy card...ha ha ha
My DD is going to a party for a little boy on Sunday. Now, as some of you know...I am a mother of 3 GIRLS...boys are a very foreign concept to me...lol. So I used my "phone a friend" life-line to ask for gift ideas (she has 2 boys and no girls), and then made this card. 
I used the sketch from the Repeat Impressions What If? Wednesday Sketch. The card image is from TAC. I stamped it in not quite navy, and added a couple mirrored gems to it. The green PP is from the Guy Stack from DCWV, and the card paper is one I had on hand...I can't remember who makes it. I added some brown ribbon, and brown buttons. No glitter or shimmer...just some "hubcaps". Well that is it for now. I have a couple other cards I made today too for challenges, and I will share those later. Don't forget to stop back Friday AM for our QKR Stampede Blog Hop!
I used the sketch from the Repeat Impressions What If? Wednesday Sketch. The card image is from TAC. I stamped it in not quite navy, and added a couple mirrored gems to it. The green PP is from the Guy Stack from DCWV, and the card paper is one I had on hand...I can't remember who makes it. I added some brown ribbon, and brown buttons. No glitter or shimmer...just some "hubcaps". Well that is it for now. I have a couple other cards I made today too for challenges, and I will share those later. Don't forget to stop back Friday AM for our QKR Stampede Blog Hop!
Christmas Owl
Thursday...that means one more day until I get to pick up my baby from camp!!!! I am soooo excited! I bet she will be talking non-stop for the next month about camp. lol. Well today I wanted to share a quick QKR Stampede card I made. Tomorrow is our big July Blog hop...details at the end of this post. This month the ladies on the DT have been showing off some of the great Christmas and winter QKR images. I think we are trying to cool ourselves off...ha ha. Anyway, today I wanted to share a card using another one of the fabulous owl stamps from QKR Stampede. 
This adorable owl is called Christmas Cheer. I just love owls, and there are so many great owl images from QKR. I stamped this guy and colored with colored pencils. I added some crystal effects to his glasses, and some sparkling fun flock to the hat trim.  I layered the image onto some PP from TAC, and then attempted the fancy ribbon again...lol. I just love the way this ribbon technique looks. I added a little brad I made with my i-Top to the ribbon too. A simple card, but still very cute.
Now onto the good details! Tomorrow is our QKR Stampede July Blog Hop. We are calling our hop this month, Frosty in July! Come on over tomorrow morning to the QKR Stampede Blog and hop along with us. There are some wonderful "frosty" cards for you to see!
Wednesday, July 21, 2010
Creative Belli #96- Sketch and Something that moves
Hello there, and happy Wednesday! Today we have a new challenge for you over at the Creative Belli Challenge Blog. This week is it sort of a double challenge. First we have a sketch for you, but we put a spin on it. We would also like to have something that moves on there. Now...your something that moves can be a literal term...like I did, or it can be an image of something that moves in real life (ex: car, butterfly, bird, animal, etc.) So here is the sketch...
Now here is my take on it. A while back I won a set of spinner cards (precut CS to make spinner cards, with directions), so I thought this was a good time to pull those out. I had never done a spinner card before, so this was a new experience for me. I used a blue spinner base piece, and added some of these PP pieces from Imaginisce's Splash Dance Collection. The dolphin is also from that same collection. I stamped and colored it with watercolor crayons. I trimmed it out, and got it all layered up on the pennies to make it spin.
  I then layered it onto a white CS base. Now this is where I "messed up" a little...lol...being my first time. I totally forgot you can see through the hole...lol. Oh well, it still turned out really cool. Last I added some embellishments. Last year at CHA in Orlando, I participated in some focus groups, well the one group they gave us 2 bags of heat set gems and mirrored pieces. Fabulous for those of us that had heat setters...lol. Well I have one now! I recently got an i-Rock, so I have been going to town using these pieces that have been sitting in my craft room for a year now. So I added the star gem to the dolphin, and the "drops" to the sides of the spinner section. They are supposed to look like splashes. Last, I hand wrote the "Splashing by with..." on the outside, and the inside says "a birthday hi.". Well, that is it.
Now you need to head on over to the Creative Belli Blog and see what the rest of the DT ladies have come up with for this sketch with a spin! Don't forget to play along with us. We really do love seeing what others come up with. So please play along, and add your link to Mr. Linky at the bottom of the post on the Creative Belli Blog. Have a great day!
Saturday, July 17, 2010
Science Guy
Ahhh Saturday! Packing day here. I have done a lot of prep work, now it is time to get it all together...lol. I feel so organized with the packing for GS camp...lol. I actually packed each days worth of clothes in a labeled baggie. Anyway, I made this card yesterday for a challenge on Facebook. The Nikki Sivils fan page is running a contest this weekend. They asked that you post a project using some of there product on it. Well here is what I came up with.  I used some of the PP from their Henry's Brilliance Collection. The science guy image is a digi image I won as a prize from Whimsie Doodles Blog. I played along with their challenge and WON! I was so excited. I felt this guy went well with these papers, and I colored him to match. I also added some crystal effects to the glasses, beaker, and test tube.
Last, I added some ribbon, and the sentiment. The sentiment is from a SU set. I felt that it was the best sentiment I had to go with a science guy...lol. Well that is all for now. I hope you have a wonderful weekend. I am hoping to not shed too many tears at camp drop off...I have to hold myself together for my baby.
I used some of the PP from their Henry's Brilliance Collection. The science guy image is a digi image I won as a prize from Whimsie Doodles Blog. I played along with their challenge and WON! I was so excited. I felt this guy went well with these papers, and I colored him to match. I also added some crystal effects to the glasses, beaker, and test tube. Last, I added some ribbon, and the sentiment. The sentiment is from a SU set. I felt that it was the best sentiment I had to go with a science guy...lol. Well that is all for now. I hope you have a wonderful weekend. I am hoping to not shed too many tears at camp drop off...I have to hold myself together for my baby.
Friday, July 16, 2010
Another Card by the Morgan
Here is Morgan's card for the Children's Challenge Corner. The challenge this time is a color challenge. The colors are citrus or green, yellow, and orange. Here is her card.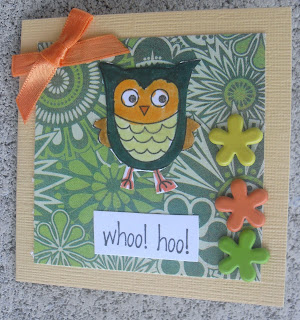 She stamped and colored this little owl from SU. She cut it out herself, and picked this funky PP from Basic Grey. We found a little orange ribbon bow in my stash, and she picked out the three brads to match too.
She stamped and colored this little owl from SU. She cut it out herself, and picked this funky PP from Basic Grey. We found a little orange ribbon bow in my stash, and she picked out the three brads to match too.
Frog Prince
Next Saturday we are going to a birthday party for my dear friend's daughter. She is really into Princess Tiana from Princess and the Frog right now. So I thought it would be cute to make a card going along with that theme. I am also desperately seeking a Princess Tiana purse or tote bag...lol. I was about to find a really cute body care set from Avon, for her, but wanted a purse or bag to put it in. Figures when I need it I can't find it. I have gone to 3 stores looking already. Got a couple more to check still, and a week to do it. Anyway, here is the card I made for her. I started with this rainbow CS base. I bought this paper a few years ago, and have hardly used it, but at the time I just HAD to have it. So I was inspired by the card I made the other day to pull the embossing powder back out. Haven't used it in forever. So I stamped the crowns and stars all over the paper and embossed in gold. Next I added the yellow ribbon to the edge. The frog prince was next. I stamped and embossed him in gold also. I colored him with watercolor crayons. Here I am calling it a him...if I am going with the Princess and the Frog theme I guess it could be a her too...lol. She was a frog in the movie for awhile...lol. This frog image and the crowns, stars, and sentiment are all from a TAC set. I attached the images and sentiment with foam tape. Last I added the little "jewels" to the crown. I am just loving my i-Rock!
Well that is all for now. Have a great weekend. Not sure how much I will be able to craft this weekend. This is the weekend we drop my oldest DD off at camp for the week. I can't believe my baby is going to camp!!!!!
I started with this rainbow CS base. I bought this paper a few years ago, and have hardly used it, but at the time I just HAD to have it. So I was inspired by the card I made the other day to pull the embossing powder back out. Haven't used it in forever. So I stamped the crowns and stars all over the paper and embossed in gold. Next I added the yellow ribbon to the edge. The frog prince was next. I stamped and embossed him in gold also. I colored him with watercolor crayons. Here I am calling it a him...if I am going with the Princess and the Frog theme I guess it could be a her too...lol. She was a frog in the movie for awhile...lol. This frog image and the crowns, stars, and sentiment are all from a TAC set. I attached the images and sentiment with foam tape. Last I added the little "jewels" to the crown. I am just loving my i-Rock!Well that is all for now. Have a great weekend. Not sure how much I will be able to craft this weekend. This is the weekend we drop my oldest DD off at camp for the week. I can't believe my baby is going to camp!!!!!
Morgan's Challenge Card
Hi there. I am posting this card for my oldest DD. She made this card for 2 challenges. She used bears, which is the challenge this month over at the Little Hands Do Crafts Blog. She also added some "bling" with is the challenge over at Kona Kid Krafter's Blog. 
The bear image is from TAC. She colored with markers, and layered onto the PP which is from the Target $1 spot. She added some heart ribbon. The sentiment is from the same set the bears are from. She even used the corner rounder this time. She added some cotton candy stickles (bling), and the little mirrored gems (which I had to help her put on with my i-Rock). Thanks for looking at her work!
Thursday, July 15, 2010
Under the Sea...
So last night I had this idea for a card that I thought would work. Well it didn't turn out as I had wanted it, but my hubby said to post it anyway and see what people think. So I used the Mojo Monday Sketch for this week, and I used embossing powder which is the challenge this week for Whimsie Doodles. Here is what I ended up with. The background PP is from Doodlebugs. I layered that onto the white CS base. I flipped the sketch, so the "square" image is in the bottom corner. I used one of the new Imaginisce snag 'em stamps from the Splash Dance line. I stamped him with versa-mark, and embossed with lilac embossing powder. I colored with watercolor crayons, and trimmed him into the 4 squares. I layered those onto some dark pink CS, and used lilac twill ribbon. For the top, I cut a dark pink CS 1/2 circle, and layered a white one onto that. The sentiment is from TAC.
Ok...that is it...Not my favorite, but I wanted to share anyway...lol. Thanks for stopping by!
 The background PP is from Doodlebugs. I layered that onto the white CS base. I flipped the sketch, so the "square" image is in the bottom corner. I used one of the new Imaginisce snag 'em stamps from the Splash Dance line. I stamped him with versa-mark, and embossed with lilac embossing powder. I colored with watercolor crayons, and trimmed him into the 4 squares. I layered those onto some dark pink CS, and used lilac twill ribbon. For the top, I cut a dark pink CS 1/2 circle, and layered a white one onto that. The sentiment is from TAC.
 Ok...that is it...Not my favorite, but I wanted to share anyway...lol. Thanks for stopping by!
Watermelon!!!!
Ohhh watermelon...how I love the watermelon. I have been craving watermelon like crazy this summer. Between my hubby and myself I think we eat an entire watermelon in 2 sittings...lol. At least it is healthy...ha ha. Anyway, today I wanted to share a card I made for the Simon Says Challenge this week, which is "fruity".  I used this adorable newly released clear stamps set Cocoa Mouse with the Watermelon image from Sweet 'n Sassy stamps. Isn't he cute???!!! I colored him with colored pencils. I actually stamped a 2nd image so I could cut out the mouse head and add some foam tape under it for a 3-D effect. I layered the green PP unto the white CS base. I then cut 2 pieces of the pink PP the same size at the image rectangle. I used a corner rounder on the corners. I then layered the image with foam tape, and added the flowers. For the center of the flowers, I used my new i-Rock to add some pearls. Last I stamped the sentiment using another Sweet 'n Sassy image.
Well that is all for now. I am off to get my girls from VBS soon, and headed to Kolh's to use my $10 off $10 coupon. Gotta love that! Have a great day!
 I used this adorable newly released clear stamps set Cocoa Mouse with the Watermelon image from Sweet 'n Sassy stamps. Isn't he cute???!!! I colored him with colored pencils. I actually stamped a 2nd image so I could cut out the mouse head and add some foam tape under it for a 3-D effect. I layered the green PP unto the white CS base. I then cut 2 pieces of the pink PP the same size at the image rectangle. I used a corner rounder on the corners. I then layered the image with foam tape, and added the flowers. For the center of the flowers, I used my new i-Rock to add some pearls. Last I stamped the sentiment using another Sweet 'n Sassy image.
 Well that is all for now. I am off to get my girls from VBS soon, and headed to Kolh's to use my $10 off $10 coupon. Gotta love that! Have a great day!
Merry Christmoose
Hi there. It is QKR Stampede Thursday here on my blog. This month we wanted to feature some Christmas in July stamps. We will be having a blog hop coming up where will be show you all sorts of fun Christmas/winter eye candy. More details to follow on that hop, which will be NEXT Friday 7/23. Now onto today's card. Check this out...
Look at that Moose!!! This guy is called Med. Winter Moose. You can find him and many other winter and holiday images in the QKR Stampede Store. I stamped this guy and colored him with marker. I added some liquid applique to his hat brim and hat puffball. Which by the way I HATE pom pom balls...lol. You know how we all have our funny phobias...well for some reason I can't stand pom pom balls...lol...they are soooo gross to me. Ok...enough rambling...I layered this guy onto a cream color circle. I layered that circle onto some pine PP, and put it all together on some brown PP. The PP's are some that I had from SU. I hand wrote the sentiment "Merry" "Christmoose".
Well that is all for today. Thanks for stopping by. Hopefully this winter moose helped cool you off too!
Monday, July 12, 2010
Pink Lady Love Bug
Hello there. Hope you all had a wonderful weekend. Ours was busy, as always. We had a birthday party on Saturday to attend, and I went to look at reception halls with my SIL on Sunday afternoon. And of course the other usuals with all that, church, family walks and bike rides, etc. The other day I stamped off a bunch of my new Sweet 'n Sassy clear stamp images I just got in the mail. While watching a movie with my hubby, I colored them, and today I got a chance to make a card with one of them. I used this week's Sweet Stop Sketch for this card.  I started with a white CS base, and layered some light pink CS onto that. I used a boarder punch from SU for the scallop, and layered that under the dark pink CS. The polka dot ribbon is from Papertrey Ink. The ladybug PP is from DCWV stack Nana's Kids. The image is from the Sweet 'n Sassy set called Little Lady. It is actually a set Korin at Sweet 'n Sassy was so kindly giving away with the purchase of any 3 sets. It is sooo cute too! I colored the ladybug in different shades of pink to match the ladybugs on the PP. I added some stickles to the flower, and last a little dark pink ribbon bow to the front.
  Well that is all for now. I have a few other projects started already, just didn't get to finish yet. Have a great day!
I started with a white CS base, and layered some light pink CS onto that. I used a boarder punch from SU for the scallop, and layered that under the dark pink CS. The polka dot ribbon is from Papertrey Ink. The ladybug PP is from DCWV stack Nana's Kids. The image is from the Sweet 'n Sassy set called Little Lady. It is actually a set Korin at Sweet 'n Sassy was so kindly giving away with the purchase of any 3 sets. It is sooo cute too! I colored the ladybug in different shades of pink to match the ladybugs on the PP. I added some stickles to the flower, and last a little dark pink ribbon bow to the front. Well that is all for now. I have a few other projects started already, just didn't get to finish yet. Have a great day!
Morgan's Summer Themed Card
The current Kona Kid Krafter's Challenge is "Summer" cards. Here is the card my oldest DD Morgan made for the challenge. She used this Hero Arts image of a lighthouse. Since we have been spending a lot of time down by the water in our family this summer. She colored it with markers, and trimmed it. She added some green ribbon she picked out, and a little green brad. She asked me to write the sentiment, and she went over it with marker. Thanks for looking at her work!
She used this Hero Arts image of a lighthouse. Since we have been spending a lot of time down by the water in our family this summer. She colored it with markers, and trimmed it. She added some green ribbon she picked out, and a little green brad. She asked me to write the sentiment, and she went over it with marker. Thanks for looking at her work!
Friday, July 9, 2010
My Niece's Gift
A few months back I made a little chipboard album for my nephew's birthday. Well, this weekend is my niece's party, so I decided to make a little chipboard album for her too. I used my Cricut to cut out the chipboard pieces. I cut them into the shape of a ballerina tutu...since she is a dancer. 
There are a couple pages that are just colored CS, and I added some ballerina stickers to them. The book is very plain, but I thought it would be fun for her to add her own touch to it. I hope she likes it! I have really enjoyed making mini chipboard albums as gifts lately. I think they are a fun way for kids to explore paper crafting as well.
Here is the front side and cover.
Here is the back side
I used various papers for this. There is PP from the Target $1 Spot, as well as from DCWV stack (Nana's Kids), and some pieces of Disney papers I purchased as single sheets. I cut her name out of pink CS, and attached to the cover. I added a flower, and some gems using my i-Rock. 
There are a couple pages that are just colored CS, and I added some ballerina stickers to them. The book is very plain, but I thought it would be fun for her to add her own touch to it. I hope she likes it! I have really enjoyed making mini chipboard albums as gifts lately. I think they are a fun way for kids to explore paper crafting as well.
Thursday, July 8, 2010
Imagainisce July Sketch Challenge
Hi there. I wanted to play along with the Imaginisce Blog July Sketch Challenge. I think this is one of my favorite companies. Their stuff is always so cute! The challenge is to use the sketch provided, and at least 75% of the products used on the card have to be from Imaginisce. 

Well that is all for now. Thanks for looking!
I used the PP and snag 'em stamp from the Twitterpated line. Which is just ADORABLE! It is "retired" though =(. I stamped the little fox and colored him with watercolor crayons. I added some white fun flock to him too. 
I attached a little circle punched fox using foam tape. For the flowers, I used some flowers from the bitty blossoms pack from Imaginisce. I used my brand new i-Rock to add some pearls to the center of each flower. Well that is all for now. Thanks for looking!
QKR Stampede...Camp Notes
Hi there! Hope you are having a wonderful week. Today is my day to post over on the QKR Stampede Blog. So I am also going to share my cards for today with you here. In just 10 short days, I will be dropping my oldest DD off at girl scout overnight camp. This is the first time we have ever done this. Needless to say, she is super excited, and mom...well I am having issues...lol. I thought it would be fun to make her a little set of note cards that she can mail out while she is away. I am going to have the envelopes all addressed and stamped for her too. I can't wait to get one of these in the mail!  I thought these 2 images from QKR Stampede were perfect for these little camp notes. They are both very simple cards. I used some PP from the DCWV stack called Nana's Kids (my favorite stack from them). I layered that onto the white CS base, then added the "hello" and "from camp!" sentiments to the corners. for the yellow background card I used the Roasting Marshmallows image, and for the colored PP I used the Patchwork Sun image. Here is a close-up of each card.
 That is all for now! Have a great day.
I thought these 2 images from QKR Stampede were perfect for these little camp notes. They are both very simple cards. I used some PP from the DCWV stack called Nana's Kids (my favorite stack from them). I layered that onto the white CS base, then added the "hello" and "from camp!" sentiments to the corners. for the yellow background card I used the Roasting Marshmallows image, and for the colored PP I used the Patchwork Sun image. Here is a close-up of each card. That is all for now! Have a great day.
Wednesday, July 7, 2010
Quick Challenge Card Post
Hello there. If you are here to see my creation for this week's Creative Belli Challenge please scroll down one post. Otherwise, I just wanted to share a couple cards I made for some challenges. This first card I used this week's Sweet Stop Sketch. I also am using this card for this week's Simon Says Challenge, which is a card inspired by the photo on their blog HERE. This card also is fitting for the Whimsie Doodles challenge today, which is inspired by the Zach Brown Band song "Toes". For this card I used this digi image from Whimsie Doodles which was a freebie on their Facebook page for being a fan. (Thanks for that by the way). I colored the image with colored pencils, and added some crystal effects to the glass to make it shiny. I layered the image onto some PPs from the TAC Surf stack (which is retired). I added some teal ribbon, and some teal mirror gems, which I used my new i-Rock to attach!
For my next card, I used this weeks Mojo Monday Sketch. I also am using this card for this week's Cupcake Craft Challenge, which is to make a sports card in honor of the World Cup.
For this card I used this digi image from Whimsie Doodles which was a freebie on their Facebook page for being a fan. (Thanks for that by the way). I colored the image with colored pencils, and added some crystal effects to the glass to make it shiny. I layered the image onto some PPs from the TAC Surf stack (which is retired). I added some teal ribbon, and some teal mirror gems, which I used my new i-Rock to attach! For my next card, I used this weeks Mojo Monday Sketch. I also am using this card for this week's Cupcake Craft Challenge, which is to make a sports card in honor of the World Cup.
I used this ballerina image from TAC and colored her with watercolor crayons. I layered her onto some purple CS. The sentiment is from the same TAC set. I cut that with a square punch and layered onto a purple scalloped square. The PPs are from the DCWV stack Nana's Kids. I added some purple ribbon, and some purple stars (attached with my i-Rock).
Well that is all for now...off to take the kids to swim lessons.
Creative Belli Challenge #95 - Alter Something
Hi there and happy Wednesday. Today we have a great new challenge over at the Creative Belli Challenge. Our challenge this week is to alter something you have had laying around. You know that thing you bought or saved a long time ago and said you were going to alter. Well now is the time, and we want to see it! Well, this was a great challenge for me. About 3 years ago my mother gave my DH this wonderful box full of tea. It is a super thick cardboard, and I thought it was really neat. So...I saved it...and it has been sitting in my craft room for the last 3 years collecting dust. Well, NOT ANYMORE! Shadow box creations seem to be in, so I thought this would make a great shadow box creation. Here is what it looked like before I got a hold of it.
 And here is what it looks like now.
 Isn't this adorable???!!!! I thought it would make a fun wall hanging. I used some PPs that I have had for awhile too. The PP in each "box" is all from the same set, which I believe was a sale-a-bration set from SU a couple years back. The papers on the outside of the box I got back in March at a crop I went to. The colors all went together perfectly. I printed our names on the computer in the same green and blue in the PPs. I attached them to each box using foam tape. I added a photo of each family member. For the letters and 2010, I used my cricut to cut them out. Last I added some embellishments to the outside of the box. Here are some close-ups of the various flowers I added.


And here is what it looks like now.Isn't this adorable???!!!! I thought it would make a fun wall hanging. I used some PPs that I have had for awhile too. The PP in each "box" is all from the same set, which I believe was a sale-a-bration set from SU a couple years back. The papers on the outside of the box I got back in March at a crop I went to. The colors all went together perfectly. I printed our names on the computer in the same green and blue in the PPs. I attached them to each box using foam tape. I added a photo of each family member. For the letters and 2010, I used my cricut to cut them out. Last I added some embellishments to the outside of the box. Here are some close-ups of the various flowers I added. I made these by cutting a circle into a spiral, and curling them up.
For this flower, I used various pieces of ribbon and attached them to the circle center. I added some yellow flower soft to the center of the flower too.
This is just a layered paper flower with a gem in the middle. 
This is another layered paper flower with a button in the middle.
Well, that is all for now. I hope you play along with us this week at the Creative Belli Challenge. Be sure to stop over to the Creative Belli Blog to see all the altered items the DT ladies have created for inspiration, and be sure to link up your creation so we can see it.
Subscribe to:
Posts (Atom)